Wednesday, November 2, 2011

Wanna Snnnnaaaaaccckkk????

Last weekend we went camping. This sounds like a pretty normal statement had it been July or August, maybe even September, but this was October. Not the beginning of October, the END of October. You know what happens at the END of October? It's cold! FRICKIN COLD!

Now I knew it would be cold. Don't get me wrong, I knew it would be cold. I knew we would be in a tent, I knew we would have a heater and warm sleeping bags. All of this I knew. What I didn't know was that the wrong rain cover for the top of our tent, which coincidentally is all screen, was packed. Our tent is a 12 man tent. The cover we had with us in the dark of a cold October night was made for a six man tent. At first we thought we just had it the wrong way on the tent. Round and round we went trying to make that cover fit. Why isn't this working? Hmmmmm...BECAUSE IT GOES TO THE OTHER TENT!

We made due and did our best to get it to cover as much screen as we could. Let's just say that once you were inside the ventilation was superb and the view of the stars was good too on one side of the tent. Anyway, we blow up the air mattresses and get all of the blankets set. Turn that little heater on full blast. My famous last words, I think it is getting warmer in here already.

We were there with Kim, our sitter, and her family and some of their friends. They all had campers, so no one else had any tent drama. We go and enjoy a nice WARM campfire, which always includes lots of yummy snacks. We may not have been prepared with the tent, but we were prepared with the snacks. All of you that know me know that I always am ready with snacks. Wanna snnnnnaaaaccck?

They look innocent, but so do babies and any mother
knows how innocent babies really are.
I busted out the pretzels. You may be thinking pretzels, really? Yuck. I know that is what I usually think about pretzels unless they are dipped in chocolate, but these are no ordinary pretzels. These pretzels come straight from Noni's kitchen. I have no idea where or when she got this recipe, but I have been eating these pretzels as long as I can remember. These pretzels are addictive. You will not be able to eat just one. I challenge you to try.

Here is what I did:

2 bags of pretzels, those mini ones,  not sticks or rods, regular pretzels
1 1/2 cups of Butter flavor Orville Reddenbacher Oil, the kind you use to make popcorn in a pot
1 tsp lemon pepper, heaping
1 package of powdered ranch dressing like Hidden Valley


Whisk together the oil, lemon pepper and the powdered dressing so there are no clumps. Put the bags of pretzels into a really large bowl. I actually used my roasting pan, so that I could easily mix them with out them spilling everywhere. Take the liquid mixture and pour it over the pretzels and then mix. I like to use a rubber spatula to mix, so that I can scrape the bottom and get the pretzels fully covered. You are going to let them sit and then turn them again, trying each time to get them covered with the oil mix. This is going to take some hours, yes hours, so do it on a day where you have time or will be in and out. Continue to turn them until all of the oil has absorbed into the pretzels. Store them in a ziploc bag.

That's it! Go ahead and try to eat just one. You won't be able to.

Although camping was freezing at night and NO it was not getting warmer in there, we did have an absolute blast on Saturday. The kids loved it and so did we. Thanks Kim for all of the fun!

Tuesday, October 11, 2011

Paula Deen, don't do me dirty.

I've been into comfort foods lately and who does comfort foods better than Paula Deen? No one is the correct answer. The woman uses real butter and sugar without apologizing. Why should she? Everything she makes always tastes great, right?

We took a family trip out to County Line Apple Orchard in Hobart, Ind. I love this place. It is super cute, the kids love it and the apples are so good. They are at the right height for picking, even for the smallest of kids and watching the kids munching away right there in the orchard is just the best. I think everyone who has ever been apple picking starts out by saying "We aren't going to get too many." We all know what happens to best laid plans. Another year of going to the orchard, not to pick too many, and we have come home with a HUGE amount of apples.
Little picking machines. Even munchkins can
reach the apples!

Wondering what the H-E-double hockey sticks (GO HAWKS) we are going to do with all of these apples I turned to my trusty internet. I know, I know, I need an intervention, but come on already, if you don't know what to do, Google it. I made my way over to www.pauladeen.com when I came across a lovely little recipe for Apple Cinnamon Cupcakes. First thought, my God, that would be good with a cup of coffee or after dinner for dessert or maybe just for a snack or you know, anytime at all.

Since I was already on her site, I remember my friend Stacey telling me just how delicious the Ultimate Lady's Cheesy Mac and Cheese was on Paula Deen's site, so I made my way to that too and thought, let's do this! I was on a mission. A mission from, butter, sugar, more butter and cheese. Sounds like heaven right? Well, you might have a grabber after eating this, but still it's heaven.

I started with the cupcakes because the dough is the kind that has to rise with yeast and they sounded time intensive, but it was PAULA DEEN, so I made an exception.

This is what I did:
For the Roll
2 cups 2%milk
1Tbs dry active yeast
1/3 cup white sugar
2tsp salt
6 1/2 cups flour, divided
2 eggs
1/4 cup unsalted butter at room temp

Warm the milk to about 110 degrees in the microwave and in a large bowl, dissolve yeast and sugar into the milk. Give it a few stirs and let it sit for a few minutes. Add the salt and 2 cups of flour and beat for 2 minutes. Then beat in eggs and butter and stir in remaining flour a half cup at a time. (Don't loose count, I did, but it was ok.)

Once everything is in and mixed well, you should have a sticky dough ball. Turn it out onto a lightly floured surface and kneed until elastic, about 5 minutes, adding a little flour until not sticky to the touch.

Put the dough back into a bowl and cover with a towel in a warm place for about 40 minutes until it has doubled in size. Then roll it out onto a floured surface into the shape of a rectangle about 1/4" thick. Now, this is where I started, just started getting nervous because this was one whopping piece of dough. Oh, Paula!

Filling
1/2 cup unsalted butter melted
1 cup sugar
1 cup brown sugar
3 TBS cinnamon
1 cup loosely chopped pecans
2 cups finely chopped tart apples(like golden delicious or granny smiths) Next time I would use more apples.

Take half of the melted butter and brush it over the top of the dough. The whole thing should be a glistening slab of rectangle shaped dough. Then mix both sugars, cinnamon, pecans and apples in a bowl and then spread this over the dough leaving an 1" empty around all edges.

This is where it gets tricky. You now have to roll this monstrosity along the LONG side into a huge log of sugary goodness. Paula, what the heck? This is enormous! How in the world is this EVER going to fit into cupcake tins. There is no way. NO WAY. Paula, I love you and all, but I am starting to think. Paula don't do me dirty.

Ok, you have this huge log of dough and you are supposed to slice it 27 times and stuff these slices into cupcake tins. Sorry everyone, I never thought I would say this, but Paula was wrong on this one. Quick thinking, quick thinking, quick thinking...Cinnamon ROLLS! YES! ROLLS!
Yeah, there was no way those were fitting into
cupcake tins. Kinda like me into skinny jeans.


I get out my glass pie dishes and I spray them so nothing sticks and start cutting and placing all of these rolls into the dishes. There we go. Crisis averted, Paula you are still on my good list. Now cover these with a towel and let them sit for another 40. Yes, time intensive, but still hopeful for a good turn out. Paula, don't do me dirty.

40 minutes later, brush the tops with the remaining melted butter and bake. Now if these were cupcakes it says 20 minutes. Nope, these are rolls all packed together. It took about 40 minutes at 350, I think. I ended up even having to cover the edges with foil because they were browning to fast and the center wasn't done. Paula, don't do me dirty was just repeating over and over in my head by this point.

Beep beep beep, the sound of my timer. Finally, done. Now for the glaze.
The finished product. OMG, give me a fork.
1 cup of powdered sugar and 2 TBS PLUS 1 tsp of apple cider. Mix this all up and it will be a yummy glaze to top off the cinnamon rolls. Drizzle away. Yummy.

I must have been feeling a little nutty by this time or maybe I wanted to see how this other Paula recipe was going to turn out, Paula don't do me dirty, but I thought let's do this Mac and Cheese.

This is what I did:
2 cups dried elbow mac
1/3 cup of grated cheeses, swiss, jack, colby, munster, gouda. So, I couldn't find all of these grated, I had to do it myself.
1/2 cup sour cream
4TBS butter in pieces
3 eggs
1/2 tsp salt
1/2 tsp pepper
1 1/2 cup milk
non-stick spray
Cook pasta al dente, about 10 minutes. Drain and place into a large bowl. While pasta is hot, add all of the cheeses and stir. In a separate bowl, whisk sour cream, butter, eggs, salt, pepper and milk. Add this to the mac. Spray the 13x9 casserole dish and pour everything in. Bake at 350 for 30-45 minutes until bubbly, top with more cheese.

CHEESE makes everything better.
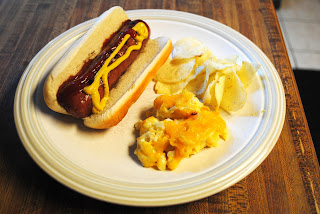
After my cinnamon rolls, all I could think is, this better be good. Paula, don't do me dirty. My motto is cheese makes everything better and in this instance, it was better. So better. So, so better. This mac and cheese is really really good. We had it with jumbo hot dogs and chips. It was perfect. We had cinnamon apple rolls for dessert and YES, they too were delicious. I came, I made and modified and it was a success.
Oh, my, yummy.

Thank you Paula Deen for being the queen of all things good.

Sunday, September 18, 2011

We are all skeptics.

Looks like apples, tastes like apples,
but it's not apples!
My work friends are cool. They are the reason I semi-like going there. They give me great ideas for many of the things on my blog and they are usually the taste testers. My friend Carl, from work, eats a lot of "fake" things and tells us how they taste just like something else. For example, the fake Big Mac. He keeps on telling all of us about the fake Big Mac and how it really does taste just like the real thing. I'm skeptical. How in the world does fake meat ever really taste like a real Big Mac?

This is zucchini,
not apples. Skeptical.
Sliced up and ready to go.
Fake apples.
Well, now that it is fall and everyone's gardens are overflowing, there was a giant zucchini left on the table in the staff lounge, free for the taking. Seriously, this thing was huge. We split it in three and of course, Carl is telling us about this fake apple crisp that you make out of zucchini and that I should try to make it. Skeptical, but intrigued.

Wait! Could it be?
Apple or zucchini?
He emails me the recipe and I take it home, still skeptical, but since I had all of the ingredients, I thought, what the hell. I told Jasen all about this because I sometimes try to trick my family into eating things that they end up loving, but have no clue what's actually in it. Turkey Tacos. He is instantly in for this little journey down the fake apple crisp road. Skeptical.


Here is what we did:
8 cups of thinly sliced zucchini, like you would slice apples if it was real apple crisp.
3/4 cup lemon juice
1 tsp ground nutmeg
1/2 cup white sugar
2 tsp cinnamon, I actually messed up here and put in 2 Tbs and it was delicious.

topping
1 1/3 cups packed brown sugar
1 cup flour
1 cup rolled oats
2/3 cups of butter, room temp

My favorite part, the crumbly topping.
Oh how I love you crumbly topping.
Place the slice zucchini and lemon juice in a large sauce pan and cook over medium heat stirring occasionally until they are tender. It takes about 15 minutes. Add the nutmeg, sugar and cinnamon and blend until the sugar dissolves. Remove from heat and pour into a greased 13x9 glass baking dish.

Make the topping by combining the brown sugar, flour, oats and butter. Mix this all around until it is crumbly. This takes a little work to get it all crumbly, but it is worth the mixing. Sprinkle this over the top of the zucchini and bake at 350 for 50 minutes or until the top is golden. Serve with vanilla ice cream.

The house smelled like lots of cinnamon and we took this out of the oven a little less skeptical because it smelled sooooo good. We scooped it into bowls and topped it with ice cream. Even less skeptical because it looked soooooo good. Then we tasted it. Maybe that fake Big Mac really does taste like the real thing.

Saturday, September 10, 2011

What's Up? Chicken Butt!

Looks like you got a corn cob stuck up
your butt.  Nope,that's a beer can.
Butt, seriously, look at the
placement of the thermometer.
My friend Tracy, who is also my cousin which is a whole different story, sent me a link to Beer Can Chicken. I have seen this one before and have always wanted to make it. I have no idea what has been holding me back, but now that I have made it and it was DELICIOUS, I will be making it again, but with one of my little changes, of course. I might just do this rub to wings because the skin is so good.

My little helpers were in the kitchen today delegating and supervising when I had to rinse the chicken. I turn on the cold water, cut open the wrapper to the chicken and both kids said, "What are you going to do with that??" Logen also wanted to know where the chicken's head was. That alone turned into an interesting conversation. I start washing the outside of the chicken and tell the kids he is getting a bath and the both laugh. Then, I rinsed out the inside and the water started flowing right from where the chicken's head should be, Logen informed me, right out of his butt. When the shower of water came rushing out of that chicken's butt, the kids busted out! It was more than a 3 and 5 year old could handle. Imagine Hyenas. That is what these two sounded like. I can't knock them. Just hearing someone say fart still makes me giggle. Yes, I know, very sixth grade of me, but come on people, you know you laugh at fart too. Fart, fart, fart. Ok. Back to the story.

The little helpers
yucking it up for
the camera.
So the kids are busting up about this chicken's butt and I pat him dry with paper towels only to put a half of a can of beer onto a plate. Again, "Mommy what are you going to do with that?" Payten did ask if she could have a sip. Yes, I know, she is the one that is going to give us the problems. We three are standing at the kitchen counter staring down the can of beer, me wondering how the hell this chicken is going to stand with this can up its butt and the kids wondering what the heck is about to happen.

Coat that little butt good. You will
be happy you did when you
get a taste in about an hour!
That's when it did happen. One can of beer right up the butt, of the chicken that is. What's up? Chicken Butt! Again laughing and giggles. Then we put the rub on and when I rubbed the chicken's butt, that's when the shit hit the fan. Not literally, of course, I did just get done washing his little butt out. Every and all butt joke they could muster up came out. Mommy is rubbing a chicken's butt, ahahahhaha! Yes, I rubbed that chicken's little butt. Patted him all up with seasoned rub, just like talcum powder onto a baby.

Now it was time for the big transfer to the grill and the moment of truth. Will the lid shut with the beer can up the butt chicken on it? I set it on the grill, started closing the lid and trumpets sounded! Yes! It fit in the grill.

That chicken sat uncomfortably for about an hour with that beer can in his butt and he was done! We carved like it was Thanksgiving and I will tell you, Beer Can Up the Butt Chicken is AWESOME! So the next time you hear someone say What's up? You go right ahead and tell them Chicken Butt!

Here is what I did:

Heat the grill to medium heat, around 375.

Rub:
1/3 cup brown sugar
2 Tbs Chili powder
2 Tbs Paprika
2 tsp dry mustard
1 tsp garlic powder
1/2 tsp salt
1/4 tsp black pepper
Mix all of the above together.

1/2 can of beer
2 Tbs melted butter

Place the can of beer onto a plate. Rinse the chicken well and pat dry, then place the chicken onto the beer can, leg to the bottom. Sprinkle about 1 Tbs of the rub into the chicken from the top, then baste the entire chicken with the melted butter. Take the remaining rub and coat the entire chicken, top to bottom, with the rub.

Take this to the grill and put it on there. Place the thermometer into the chicken by the thigh, but not close to the bone, close the lid and let it cook. When the temp reaches 180 on the thermometer, the chicken is done. It is soooo good.

Saturday, August 27, 2011

Let's Get Choppin

I said to Jasen last week while swinging on the lounge swing, Auntie and Uncle Bob know how to throw a party. We were sitting there eating poorboy sandwiches, drenched in Merichka's garlic butter (the bestest most yummy garlic butter anywhere), watching all of our family and friends eating and have a good time. The pool was a perfect blue and the kids were having fun too. What more could you want?

Auntie Janice wrangling the beasts in the pool.
Thanks Auntie and Uncle Bob for always
having the best pool parties! We love you!
This weekend rolls around and we are all in denial that summer is coming to an end, so what are we to do on a bright sunny late August afternoon? Pool Party! That's right, the weather is still warm and we are going to take full advantage of that. Auntie sends out the weekly text, pp on sat. can you bring bruschetta? My thought, consider it done. It is the absolute least I could do for all of the weekends of fun we have had over there at their house.

There it is. Bruschetta before it knew it was bruschetta.
Now, you may think that bruschetta is a challenge to make with all of the chopped veggies, but let me tell you, it's not. This is something that looks like you spent a lot of time on, but if you have the right tools, you won't. I know that I go on and on about things I like and love on my blog and I know that, if you read my blog, you have already heard about the Vidalia Chop Wizard. You may be scared because it is one of those "As Seen on TV" products. I too would have been skeptical if it weren't for Grandpa Bob buying me my first one, but believe me, this is a GREAT product. BUY IT!

After years of use, I dropped and cracked my first one. I thought, hmmm, I am going to see if I can live without it. Three days went by and I was on target.com buying myself a new one. Seriously, I use this about three times a week or more. Get it.

Ok, back to bruschetta. If you have this chopper this is a cinch.

That's it! Super duper easy and super duper delish!
Here is what I did:
Good Seasoning's Garlic Herb Dressing you will need 2 pouches and the ingredients to make the dressing.
3-4 tomatoes, they are in season and coming out of every one's ears
Peppers, 3, I used, green, red and a little yellow, but use what you like
1 Onion, but not a big one because you don't want the onion to over power everything.
Salt and pepper to taste
Garlic Bread to serve it on.

Ok, first, chop all of the veggies and I did mine on the small square chopper. Using that chopper, it took me less than 15 minutes to dice all of the veggies. Put them into a bowl.
Make the dressing according the the recipe on the pouch, but instead of the water it calls for, I used more vinegar. Use both dry pouches, but only the wet ingredients for one pouch. Pour that onto the veggies and stir. Then, add some salt and pepper to taste and mix. I also added a little extra dash of olive oil and balsamic vinegar. Nothing too major, just a little shot of each.

Cook your garlic bread of choice and that's it!
Boom! Done! Bruschetta!

Wednesday, July 27, 2011

Calling All Peanut Butter Lovers

With a slight lean, still a masterpiece!
I don't like Reese's Peanut Butter Cups. For all of you who just shouted what and that's unAmerican, yes, it's true. I just don't like them. I don't know why. I like peanut butter. I like chocolate. I don't like peanut butter cups and I am thankful. It may be one of the very rare candies that I don't like.

Sometimes I decide to make things I don't really care for, but others around me do,  because my rational is that maybe I won't eat them. That was my plan going into this next venture. Peanut Butter Silk Cake for most may sound like pure silky heaven, but to me, not so much.

My sister in law had just watched my children for me and I thought I would bring half of this over to her as a thank you, even though she probably deserved a metal of honor. She LOVES peanut butter cups, so I thought this would be a perfect surprise.

Here is what I did:
1 box of yellow cake mix
1 1/4 cups water
1/2 cup creamy peanut butter
1/3 cup veggie oil
3 eggs
1/4 cup butter (I didn't use because this step didn't work)
1/4 cup packed brown sugar (I didn't use because this step didn't work)
1 cup whipping cream
1/2 cup creamy peanut butter
1 container of chocolate frosting
1 cup chopped peanuts optional, but I did use them

Preheat the oven to 350 or 325 for dark or nonstick pans. Generously grease the bottoms only of 2 8 or 9 inch round pans with shortening or I used cooking spray.

Tryin to crack
the eggs.
Waiting patiently
for a taste.
Two pans and ready
to bake!
In a large bowl combine cake mix, water 1/2 cup of peanut butter, oil and the eggs. Do this on low for about 30 seconds, just to get it combined evenly. Then beat on medium for about 2 minutes, scraping the sides of the bowl as needed.

Pour into the two pans and bake about 30 to 35 minutes, BUT ALWAYS BE SURE TO DO THE TOOTHPICK TEST!!! Hey people just because this is the suggested bake time, if that toothpick comes out clean before the time, take the cakes out! No one wants a dry cake, yuck!!!

Cool for 10 minutes in the pan and then run a knife around the edges of the pan to loosen the cake and then place your cooling rack on top of the pan and flip the whole thing over to release the cake from the pan. Let them completely cool for at least an hour on the racks.

Ok, now this is where I deviate completely from what they wanted me to do for the filling because it doesn't work and I knew it wouldn't, so I am not even going to put it in here and confuse you. The just of what happened is you boil it down to make a Carmel mix and then you are supposed to put it in the fridge, which I knew would make it hard and crunchy, not gooey for the filling. I tried it, TWICE. It doesn't work, so I altered the filling. See below.

In a chilled medium bowl, beat the whipping cream on high until soft peaks form. Looking at whipping cream coming out of the carton, you wouldn't think it would whip up like it does. Trust me, whip it good, it will peak. Then add in the 1/2 cup of peanut butter and continue to whip it until it is all smooth and creamy. This will go in between the cake layers.

Could have probably trimmed
off more, but this worked.
Waiting for the next layer.
Is it ready yet??
Now, it says to split each of the cakes into two layers. I did this and when I went to frost the cake, it started to slip slide all over because the cream in between and the layers were thin. Next time I make this, I don't think I will split the two cakes into layers, I will just use them as the layers.

Ok, trim the cakes tops off so that they are flat. Don't throw the tops away, it is so good, eat them! Back to trimmed cakes. Now you have the two trimmed cakes, put one onto the serving plate and put the peanut butter whipped cream on top of it, about 2/3 of an inch away from the edges, and then set the next cake on top of that.

Frost the top and sides of the cake with the chocolate frosting. Press the chopped peanuts along the edge of the cake into the frosting, if you like that sort of thing.

Store it covered in the fridge.

Back to my sister in law and this cake present. Yeah, the cake didn't make it over to her house. It was so delicious. The actual cake was so smooth it really was silky. Although I still don't like Reese's, I do love this cake!

Sunday, July 24, 2011

Pesto

Pesto waiting for it's carby friend,
dipping bread.
You know what I love about Italian restaurants? They aren't afraid of carbs. The vast majority of Italian restaurants that you go into will serve you some sort of bread before your meal arrives. One of my favorite Italian places to go that does this is Parmesans in Frankfort. It's on Route 30, which is a little torn up right now, but it is worth going there. I love this place. They will bring you out these lovely dough knots with a cup of pesto sauce for dipping. It is sooooo good. Lick the container good. I want it right now just thinking about it good and it is just what I thought of last week at the farmer's market when I bought a big bag of basil.

Basil is delicious. Period. It smells wonderful and it tastes wonderful too. It's strong, but don't be intimidated because it makes great things, like pesto. So yes, I was inspired in the train station parking lot last Saturday to make pesto. Since I have never made this elusive pesto before, where did I go for inspiration? You got it, Google, my answer to everything.

I Googled it and looked a couple of different recipes for pesto. They were generally the same, variances on amounts of ingredients, some offered a few tips, so I wrote down what I thought sounded good and went from there.

Here is what I did:
2 cups of fresh basil, washed, leaves only, NO STEMS.
1/2 cup of extra virgin olive oil (but you will add more at the end)
5 cloves of garlic, sounds like a lot and it is, but I LOVE, LOVE, LOVE garlic. Cooking is about the adventure and personal tastes. Feel free to personalize it for your likes!
2 Tbs walnuts
1/2 tsp salt
1/2 cup grated Parmesan cheese
1 Tbs of lemon juice
1tsp sugar

Basil ready to become pesto.
In my food processor, I minced up the nuts first. I decided to do this because I didn't want the basil to become a mushy pulp if I added it first and then had to chop everything else in there too. Ok, chopped nuts add the garlic cloves and give another little chop. I used pulse on the processor so I could go slowly. Then I added in the basil. Pulse, pulse, pulse until the basil is finely chopped up. Don't over do it. You don't want sludge. Now, add in the olive oil, salt, Parmesan cheese, lemon juice and sugar. Pulse some more until it is all incorporated and mixed well.

Now transfer it to a container that you can seal and add olive oil until the pesto is at the consistency you like it at. This is a preference thing. That's it. You're done.

Now I store it in the fridge, but be sure to take it out before serving because the olive oil will harden in the cold and will need time to "thaw" out some.

Serve it with bread to dip. I brought this to a party on a tray with sliced salami, slice provolone and bread to dip. It was delicious and looked great too. Give it a try for an out of the ordinary appetizer. You will be pleasantly surprised.

Sunday, July 10, 2011

Sweet Little Sliders

Little sliders ready for the next party.
Vegetarian sliders for all
of my meatless friends!
Here we are in midsummer and what are we all doing? Partying! That's right, it is prime season for the backyard bbq's and driveway parties. You all know them. You all have been to them. You all have wondered after going to all of these parties, what am I going to bring?

There are only so many dips you can bring before it has all been done already. How many times can you really eat buffalo chicken dip or popper dip in one weekend? Here is a fresh little idea that my friend Karen and I had talked about. We had both seen it on the web and thought, we could do that! That is how most of my creations start.

Red Bull cutter and my
little kitchen helper.
Here are some cute little sliders that you can take to your next party to wow all of your friends. They are not really that hard to make at all.

Here is what I did:

Box of brownies, prepared as the box calls. Let them cool and cut out circles. Now, normal people will use a biscuit cutter or cookie cutter, but I didn't have one at the right size. However, I have learned that a Red Bull can is the EXACT size needed to create the "meat" for my sliders.


Box of yellow cake, prepared as the box calls. Line your cupcake tins with paper liners and fill them slightly more than half way. You don't want the cupcake to rise over the top of the edge when you bake them or your buns are going to be misshaped, every girls nightmare.

After the sliders are cooled and cut and the cupcakes are cooled, unwrap them, then cut them in half to make your "buns". This my friends took the longest to do out of alllll of the steps.
Burger and bun just waiting
for the toppings.

Ok, now you need the frosting to make your "ketchup", "mustard" and "lettuce". I used the basic frosting recipe.

1 block of cream cheese, soft
1 stick of butter, soft
run this for 5 mins in the mixer with a whisk
Slowly add in 4 cups of confectioners sugar blending after each addition.
1 or 2tsp of vanilla
Beat until light and fluffy.

Ready for the buns.
Now, I separated the frosting into three bowls and used, red food coloring for ketchup, yellow for mustard and green for the lettuce. Pretty obvious. Now, I used the Wilton coloring you can buy in the grocery store and the colors did not pop like I wanted. They were more of a pastel. I am pretty sure you can buy special Wilton food colors to get a bright red or bright green, but I didn't have that so I improvised. Then all you do is make a squiggly outline and top with the top bun.

I wish I would have gotten the sesame seeds to top the buns, but I didn't have time, so my buns were seedless, but still cute!

My little kitchen helper
escaped from bed for
a late night slider.
I brought these to work for a picnic and everyone thought they were super cute. They really weren't that hard to make. If I can make these, so can you!

Saturday, July 9, 2011

Happy Sweating

The Honeymooners.
Just like marriage, not quite the fairytale you thought
it was gonna be, but pretty damn good!
It's July, muggy, sweaty, hot July. Some people may say it's too hot, but let's remember back to the snowy cold month of December. Quit complaining. I actually love December. Yes, it's usually freezing cold and snowy, but there is the warmth of Christmas, my son was born in December and my wedding anniversary is also in December.

This year will be lucky number eight for me and my husband. Yes lucky. Lucky one of us hasn't killed the other by now. All kidding aside, we made it to eight with two wonderful, annoying at times, children, our own roof over our heads and too many blessings to list. I must say, we are pretty damn lucky.

You may wonder why anyone would choose to get married in December. One simple word, sweat. Yes, I said sweat. Anyone that knows Jasen, knows that the guy sweats, a lot. Jasen demanded, no insisted, that we get married in December so that he would not be sweating in his tuxedo. This statement truly came from an unmarried man because any married man knows that it could be negative 30 outside and you are still going to be sweating the day you get married. Since I already knew I was going to take charge of this wedding planning and I was going to get everything I wanted for that big day, I felt that I could give him this one thing. I agreed to December, for the sole reason of sweat.

The big day came. The moment of truth. Here we go. The bridal march is playing. I'm coming down aisle with my father. Jasen is standing on the alter, smiling. My dad gives my hand to Jasen and there it is, sweat, right there in the middle of December. It didn't matter. We said our I do's. We had a beautiful reception. We went on our honeymoon. More sweat.

We went to Riviera Maya in Mexico and it was amazing! I packed everything I thought I would need there. I had a little suitcase dedicated just to shoes. Every girl knows, you can never have too many shoes. Jasen thought I was nuts, which I am, but there was one thing I packed that we will both remember as our honeymoon and it was the spray and lotion from Bath and Body Works in the scent of Coconut Lime Verbena. It is and will be one of my very favorite scents because it will always remind me of our honeymoon.

Coconut Lime Verbena just screams tropical vacation. It really does, so what could be better in the middle of a hot July in Chicago? You got it coconut lime cupcakes!

I am going to admit that I was slightly intimidated by this because I have never really made a cake from scratch. No box mix here. How the heck do you even start? Me being the internet queen, that's where I went. I have come across an awesome baking blog recently, www.mycakeschool.com. You can pay to join and have exclusive access, but I have been frequenting the free blog section and I love it.

This is where I found the recipe for a Lime Cake with Lemon Lime Frosting. I immediately thought of Coconut Lime Verbena and decided to change the frosting to a coconut frosting. I made cupcakes because I am taking them to a party and lets face it, it is just easier to eat a cupcake than a slice of cake. I also embarked on making my own frosting. I envisioned a lovely light and fluffy puff of frosting atop of these little cupcakes. In my head, they were gorgeous. In the mixing bowl, the frosting was a disaster.

I told you all that I would post things, even if they didn't turn out quite like I thought they would and this is one of those times. My light and fluffy puff frosting in my head was actually a thick goo. I added all sorts of stuff to thicken it to become a fluffy puff. No deal. So here I am with this goo and I have to take them to a party. Oh well! Frost those babies. Put them in the fridge and pray for a miracle and a sign that says, eat these fast or they are going to melt.

We haven't gone to the party yet. No one has tasted them yet, so I can't really tell you if they were failures. Although they do not look like what I thought they would, they are still presentable, so I guess at least that is a win. Hopefully they will be great and no one at the party will know otherwise, unless they read this blog.

Here is what I did:
Lime Cake
2 1/2 cups regular white flour
2 cups regular granulated sugar
1 tsp baking powder
1 1/2 baking soda
1/2 tsp salt
3 large eggs
12 TBS unsalted butter, soft

Look at how he
does it with his
little pinkies all up!
3/4 cup lime juice, I used fresh squeezed, thanks to the brawn of the family, Jasen. It took about a bag of limes.
3/4 cup sour cream, I used the light and
the zest of one lime
The Enforcer. Look out limes!
I'll lay the smack down.

Set the oven to 350. This will not rise like cake normally does, even though you fill the cupcakes high.

Pretty full and they did not rise
like normal cupcakes.
In a bowl add flour, baking powder, baking soda, salt and whisk these until blended.


I told ya! I'm not lyin here folks.
Now, you could make a cake and divide it into two eight inch pans, but I did cupcakes and I used paper liners. I filled them pretty far up. I baked them for 18 minutes, until the cake testing stick came out clean. I let them cool in the pan for five minutes and them let them finish cooling on wracks.

Does this look light and
fluffy to you?
Me neither.
Now for the frosting. That f'ing frosting. I thought I could make it better by adding some things, like I normally do, but I was wrong. Yes, I was wrong, so here is the recipe that was provided. Follow it. Let me know if it works.

Coconut Frosting-remember this was for an entire cake, which is A LOT of frosting. You could probably half this and be good for cupcakes.
2lbs confectioners sugar
2 sticks of unsalted butter, soft
1/2 tsp popcorn salt, which I learned is finer so it dissolves a lot better
1/4 cup milk
Oh yeah, it makes a big
sugary mess too.
1/2 tsp vanilla
2 tsp coconut extract

Beat the butter and add the sugar gradually. I find that putting it through the sifter makes it better. Then add the milk and the flavorings, mix. Then beat on high for 6-8 minutes. It says if it is too thick to add more milk a tiny bit at a time. As you already know, mine was not thick, it was goo.

ahhhh, sweet toasted coconut.
You make me want a frappi!
I topped these with toasted coconut flakes, which I learned how to do today. Simple. Get a cookie sheet. Heat the oven to 350. Spread the flakes onto the sheet. Bake for 3- 5 minutes. Check it, it's a fast bake. Let cool. Not all of the flakes will be brown. It's ok.

So there you have it. The Honeymooner Cupcakes or for all of those that didn't get married in December because of sweat can call them Put the Lime in the Coconut and Shake It All Around Cakes.
Happy eating, happy sweating in the middle of July or December, whatever as long as it's happy.

Love you J.

Sunday, June 19, 2011

Feel Like Makin Whoopee???

whoopee Informal
interj [wʊˈpiː]
an exclamation of joy, excitement, etc.
n [ˈwʊpiː]
make whoopee
a.  to engage in noisy merrymaking
b.  to make love
 
When I hear the word whoopee, I think of definition b listed above, but after I copied and pasted this definition from freedictionary.com, I got a giggle at how well definition a and b go together. hehehe. Everyone feels like makin whoopee sometimes and on this particular night I did too.

This type of whoopee involves ripe bananas, some smashing and a lot of whipping. Get your head out of the gutter. This isn't that kind of blog. I'm talking about Banana Whoopee Cookies.

I smashed and whipped and made a lot of whoopee, so much so, that I brought some to work and to a party. It was a good time and this is what I did:

Thank you bettycrocker.com for this picture.
For pictures of making whoopee, you will have to
go a different kind of blog and don't say you've
never been there, liar.
First, I have to say that I doubled the cookie dough portion of this because there just wasn't enough whoopee to go around with just one batch. I suggest you do this too or you are going to be wanting and needing more whoopee before you know it.

Preheat oven to 375
Dough (double below ingredients)
3 smashed very ripe bananas
1/3 cup of butter soft
2 oz cream cheese soft
1tsp vanilla
1 egg
1 pouch of Betty Crocker Sugar Cookie Mix
2 TBS flour

Smash the bananas using a fork really good, stir in butter, cream cheese, vanilla and egg until well blended. Then add the cookie mix and flour and mix until very soft dough forms.

Using my medium cookie scoop or you can do a heaping tablespoon amount I scooped the dough out about 2 inches apart on an ungreased cookie sheet.

Bake 7 to 9 minutes. Right between 7 and 8 was good in my oven. The bottoms were browned nicely and they looked solid. The tops are not going to brown. They are going to stay very light. Let them cool 2 minutes on the tray and then take them off the tray and let them cool completely on wracks. 

THEY HAVE TO BE COMPLETELY COOL BEFORE MOVING ON OR THE FROSTING WILL MELT.

Frosting Filling (I did not double this and had MORE than enough for the doubled dough)
2 cups of powdered sugar
1/2 cup butter soft
1/3 cup Yoplait Banana Creme Yogurt (you only need one container of it). We could only find Yoplait in Banana Creme, but I am sure any type of banana flavored yogurt will work just fine.
1/2 block of cream cheese soft

Beat all of these ingredients on low until blended. Then whip it on high for 2 minutes. This is going to get really light a fluffy, kinda like Cool Whip, but lots sweeter. Then transfer this into a large ziploc bag and cut one of the corners off about 1/2 inch, so that you can easily frost the insides of the cookies. This saves a lot of time rather than doing it with a spreader knife.

Squeeze a circle of frosting onto the bottom of the cookie and top with another cookie, like a sandwich. Trust me, don't over fill these because when you go to bite into them, they will ooze frosting out all over. Yes people, I am aware that this post is chock-full of whoopee making innuendos. 

Once you have them all filled and topped, sprinkle the tops with powdered sugar. A sifter will do this good for you. Store them between sheets of wax paper and in the fridge.

I brought these Banana Whoopee Cookies to work and the party and after eating these everyone felt like makin a little whoopee. Thank you bettycrocker.com, although your name of banana flip cookies is not nearly as exciting as my banana whoopee cookies and I added and subtracted some ingredients to your recipe, but thank you for sparking my creative juices. Innuendos, I know.

Wednesday, May 25, 2011

A Right of Passage

Congratulations Class of 2011
It's that time of year again. It's a right of passage. It's a cause for celebration. It's graduation! Actually for our house, it is the first graduation. Yes, Jasen and I made it through school, although at times by the skin of our teeth, but none the less, we both did graduate. High school AND college. Yes, college too. This first for our household is for Logen. Our little Logi is graduating, wait for it, pre-school! (hands raised above our heads) Go Logi, go Logi!

Yeah, I know, pre-school graduation may seem pretty, how shall I say it, unimportant, but I will tell you for that little guy, you would have thought it was the biggest thing he has ever done. Technically, it probably is. Two years of school and now he is ready for the big time, Kindergarten.
Mrs. Handzik and Logen

We arrived in the parking lot to be greeted by many of our family members. This alone would have been enough excitement for Logen, as he loves having company, but when we all walked into school, his buddies were all there and although it was just pre-school, you could see the camaraderie between all of them, just like a group of high school seniors getting ready for their futures. It was all very similar in the way the talked, played and hugged. Really, right then, it totally changed my outlook on the unimportant pre-school graduation.

They went through their production of song and dance, which we video taped of course, and the teachers presented them with their caps and diplomas. Every single child looked so proud to be there in front of their families. It really was something. You could just feel their excitement. As we were leaving everyone was taking pictures, smiling and hugging and I got that nostalgic feeling. You all know what I am talking about. We've all felt it at one time in our lives, but I think I felt it because of the bonds that were made there at that school.

I have to be honest, when we first started to school, I thought I was going to be the outcast. The working mom that isn't there everyday to drop off and pick up their child, watching all of the other moms talk and knowing each other while I peered in from the outside. That's just what I thought would happen, but I was completely and utterly wrong. I am so thankful that I am able to take him to school at least one day a week, but I am just as thankful for the kind and caring moms that I got to meet and become friends with.

Our children formed bonds in pre-school and the families bonded as well. Our class suffered a great loss mid year. Everyone was affected in some way. It would be hard not to be affected. I know it rocked me to my core. It still does. It has taught me many many lessons. I carry her card in my purse as a constant reminder of the blessings I have and not to take anything or anyone for granted, ever. I will remember, always.

Tubbs and Izzy, the helpers
for this task. I always have
little helpers.
My sister in law asked Logen what he wanted for graduation and he told her, that hat, you know that graduation one. We thought that was just  so cute. I thought if that is what he thinks about graduation, that is what I am going to make him. I had seen these on www.skiptomylou.org and went back to look at them to be sure it was something I could make. I decided that this is what Logen associates with graduation, so I will do my best to make them.

Just about all you need
to get going.
Without further ado, I present the pre-school class of 2011 and Logen's Graduation Cap Cupcakes.
This is what I did:
Box cupcakes. We did yellow at Logen's request.
Tub Frosting, white. I think that the chocolate caps will show up better on white frosting.
Sprinkles, what cupcake is complete without sprinkles?
Bite size Reese's cups, unwrapped
Ghiradelli chocolate squares (TIP, there are 14 in each bag, cause it doesn't tell you on it!)
Fruit Roll Up
Chocolate Bark, one square

Bake the cupcakes as directed on the box and let them cool.
Frost them with the white frosting and sprinkle with the sprinkles.
Unwrap the Reese's cups and the Ghiradelli squares. Place the cups, large end down, a few inches apart on a wrack or baking sheet.
Cut the fruit roll up into mini strips. I used a pizza cutter, but I think scissors would work too, about 2 inches long.
Put the chocolate bark into a ziploc bag, melt it in the microwave, slowly on medium, periodically smooshing it around.
The tops are all glued on.
Clip off the corner of the bag and start squeezing a dab about the size of a pea onto the tops of the Reeses, immediately putting the chocolate Ghiradelli squares on top and let them dry.
Tassels attached.
Once they are dry now put a tiny little dab of chocolate onto the top of the square to use as "glue" to put on the strip of fruit roll up. Once they are all on, go back and put another small dab ontop of the fruit roll up to finish it off.
Once they are all dry, just set on top of the cupcakes.


There you go! Congratulations to every class of 2011, even the pre-school ones!

Sunday, April 3, 2011

Are we there yet?

Every summer as a kid, our parents would take us to a little cottage buried deep in the woods. The ride to this cottage was only four hours into Michigan, but with all the excitement and anticipation seemed like forever away. They would pack the car to the gills the night before so we were all ready when the time came to leave. Going to bed not knowing when they were going to wake you up to leave was the kick off to the ride. Once we were finally in the car and on our way, it would start...Are we there yet?

I think every kid, on their way in a car, bus, train, plane, whatever, has asked, are we there yet? I think that is something that kids just are born knowing. Are we there yet? No. Are we there yet? No. Are we there yet? NNNOOO!!!! Come on, we've all experienced it as a kid and may now be having the pleasure of being the adult and yelling no after wanting to either pull your own hair out or kill someone, but my dad had a different answer. What could it be other than no you ask? Just over that next hill. Yep. That was it. Just over that next hill.

My dad would say that and we would look ahead searching for any slight rise in the road. That must be the hill! We would make it past and no exit off of the highway. Are we there yet? You see that hill way up there? Yeah. Well, just over that next hill. This would go on for hours. My dad would do this over and over and has finally told us that his dad used to do that to them when they were on their way to vacation.

Lou? Is that you?
So you may be asking yourself right now, how does this have anything to do with a food blog? Well, here's how. We love pizza, more specifically we love Lou Malnati's deep dish pizza. If you have never had this pizza, don't waste any time, order one for dinner tonight. Eat in, take out, whatever, get one. Tip: if you get the take out, get it uncut. Don't ask, just do it.

I have been toying with the idea of making pizza. I have never made my own pizza, dough and all, from scratch. I remember my mom doing it every once and a while and I clearly remember her bitching up a storm about what a pain in the ass it was, but she would do it as a treat every so often. I must say, that remembering this has probably delayed me in giving this whole deep dish thing a whirl. For real, one store trip I bought the cornmeal, the next time, the yeast, never everything in one trip. It was kinda like being in pizza denial. If I didn't buy all of the stuff, I couldn't make it. I did this even up until the last step. I made the dough without even buying the pan. See? Procrastination, how could I make the pizza without a pan?

Anyway, I shouldn't have to tell you that I started this little deep dish endeavor much like I start all of my new endeavors, on the internet. Yes, I was doing my research. I wanted this pizza to be like Lou's. Now, if you have ever had a Lou's you know that lovely delicious butter, crunchy, just like heaven crust. I'm not gonna lie, that crust intimidates me. So, here I am on the internet, researching Lou's crust. I found some recipes and took what I thought would be the best and molded them into my own. Right now you have to be thinking, are we there yet? Right over that next hill.

I made the dough, which is a brand spankin new thing for me, and let it rest on the counter the 4-6 hours. In this time, I knew I still didn't have a pan to make this pizza pie in. I had Jasen stop at Target, no pan, Kohls, no pan. WTF, does no one in this town make their own pizza?! Maybe this is a sign from God above, you know he had to have created that Lou's heavenly crust and didn't want me trying to infringe on his success. Bed Bath and Beyond. Finally, a pan and I had a coupon for $5 off. God must be smiling up there saying, go ahead, give it a try. Good Luck.

Are we there yet? Right over that next hill. I arrive home to my well rested dough and get to work.

Here is what I did:
Dough-You need to let it rest 4-6 hours or some say overnight in the fridge is even better.
1 1/2 cups 110degree water, mine out of the tap was hot enough to do this after letting it run a little.
1 package of active dry yeast, if you let it rest overnight, otherwise do 2 packs for the 4-6 hour rest.
1 tsp sugar
4 cups of flour
1/4 cup olive oil
1/4 cup cornmeal
1 tsp salt
1/4 cup Crisco, I used the butter flavored kind
You will need a 14 inch round pan

In a bowl, combine the water, yeast and sugar, mix to combine and let sit for 5 minutes. It will get foamy looking on top and watery underneath and actually smell like dough.

Then add the olive oil, salt, cornmeal, Crisco and only 3 cups of the flour. Mix with a dough hook on low to medium until it is smooth. It will start being into a dough ball shape by now. Start adding the remaining flour 1/4 cup at a time. Each time mix it until the flour is completely incorporated. Then let it mix for 2-3 more minutes.


Pre heat your oven to 500. Yes, 500.

This is what it should look like.
Ready for the dough.
Well oil your deep dish pan with olive oil. I did this by pouring some oil into the pan and then rubbing it around with a clean paper towel. DO NOT USE THE NONSTICK COOKING SPRAY. You've come this far, oil the pan the right way. Then take some cornmeal and sprinkle it on the bottom of the pan and kind of shake around so it covers the pan.

Now you are ready for the dough. Take the dough and spread out evenly in the pan, pushing it about an inch up the sides of the pan. Are we there yet? Right over that next hill.

There you have it. The dough. This pizza better be damn good. This is a pain in the ass. I was channeling my mother there.

So now, you are ready for your toppings. We did half sausage and garlic, of course,  and the other half sausage, garlic, tomatoes and onions.

I browned the ground Italian sausage in a pan and removed it from the grease. Chopped the onions and tomatoes and was ready. Here is where it is different. I used Mozzarella slices, NOT shredded. It took TWO packages of the sliced cheese, a can of diced tomatoes, well drained and a can of tomato sauce, don't forget Italian seasoning.

Adding the final layer of cheese.
Cover the whole thing.
Logen is starving and can barely wait.
Are we there yet?
Are we there yet? Just over the next hill. Ok, you have your dough spread in the pan. Take some olive oil and brush it on the dough before topping with anything.

Take your sliced cheese and line the bottom of the pan. You got it, right on the dough. Cheese first. Then take some tomato sauce and spread it over the cheese, kind of like you are frosting a cake.

Now add the browned sausage on top of the sauce. Then add the veggie toppings of your choice and I ALWAYS add garlic. It's a big hit around here and gives wonderful flavor. Ok, don't forget to give a generous shaking of your Italian seasoning.

Now, you want to do your second layer of mozzarella cheese slices. Cover the whole thing. Frost your pizza again with more of the tomato sauce and now add the drained diced tomatoes. Sprinkle with a little parsley and with Parmesan cheese.

Ready for the oven.
Look at that hottie!
Are we there yet? Right over the next hill. Put that baby into the oven, middle rack at 500, uncovered and bake for 15 minutes. Check it and see how it is going. I actually ended up baking ours for about 22 minutes. It looked pretty good by then and the center was hot when I stuck my finger in it.  Take it out and let it "rest' in the pan for about 5 minutes. Then we and I really mean Jasen, removed it from the pan, which could have been disastrous, but ended up being ok. TIP: you need a pretty big spatula, server thing to get it out of the pan. Lift the pizza with the server and slide that baby out of the pan. Way to go Jasen!
Taste testers reporting for duty.

Are we almost there yet? Right over the next hill. So now you have your lovely pizza ready to cut. Do your traditional deep dish triangles and serve it.

Lou's Part 2: Coming soon!
Now we tasted this pizza and I thought, boy, this is good and it was my first try. Jasen was impressed and the kids ate it up too, but I thought, I'm not there yet. This isn't the same as Lou's. It's pretty damn close, but not the real deal. That's when Jasen and I started brain storming. What am I going to do differently, what am I going to add? That will be for another post. Maybe an update, an addendum.

Are we there yet? Right over the next hill.